
DATA FILTERS
Modify and clean your data before it enters your account
If you’re using Universal Analytics, view filters are your best friends.
Filters allow you to divide up your Google Analytics data so that you only see what you actually need when evaluating your website traffic.
Proper filters can save you a ton of time, help you make better decisions, and generally impress everyone around you.
So it’s super frustrating when your filters aren’t working properly!
So what can you do when your filter isn’t working? Troubleshooting Google Analytics filters can be a pain and the problem is usually related to a small setup detail. Pay attention to the little things that can have a big impact and be sure to test your changes before moving on.
Today, we’re going to walk you through the most common reasons your Google Analytics view filters aren’t working, what to do about it, and how to test your changes right away.
So, sit tight and come with us through the world of filters and learn how you can fix your issue today.
Wait a Bit!
First, keep in mind that Google Analytics does not retroactively apply view filters, so new filters will not affect any data you had before setting them up.
It can also take some time for your filters to take effect. So, if you’re getting concerned that your filter isn’t working, but you’ve just set it up- wait 24 hours before getting too upset. It might just be that your Filter hasn’t kicked in yet.
Your IP Address is Incorrect
A really popular use of View Filters is setting one up to exclude your company’s internal IP addresses. This kind of filter is super helpful because your employees can falsely inflate your metrics if they’re visiting your site frequently.
If you’re using a filter to exclude an IP address, always double-check that you’ve entered it correctly. This is a common problem and an easy fix. You can easily check your IP address using Google by searching “What is my IP address?”

You Have a Dynamic IP Address/Multiple IP Addresses
If your IP address is dynamic, that means the number can change. This is an issue for your View Filters because if you’ve entered your IP address as a certain number when setting up your Filter, and that’s no longer the case, it won’t be excluded.
You might also have an issue with your IP Filter because your employees are working from home. This means they all have unique IP addresses, and to further complicate things, they could also have dynamic IP addresses.
This is a challenge.
Previously, you could Filter by Network Domain and Service Provider, making it easier to set up a Filter to catch all your internal access, but Google did away with those dimensions in 2020.
A workaround for you, in this case, is to set up a segment that excludes user traffic when they visit a certain page on your site. You can set up an internal landing page that is only available to your employees and require that they visit it when they are active on your site.
You can filter out all this employee traffic by setting up a new segment for users who visit your internal page. This will help you see all traffic that is not coming from your employees.
To set up a Segment in Google Analytics, follow these steps:
1. Go to your desired property.
2. Click on “Audience.”
3. Click on “Overview.”
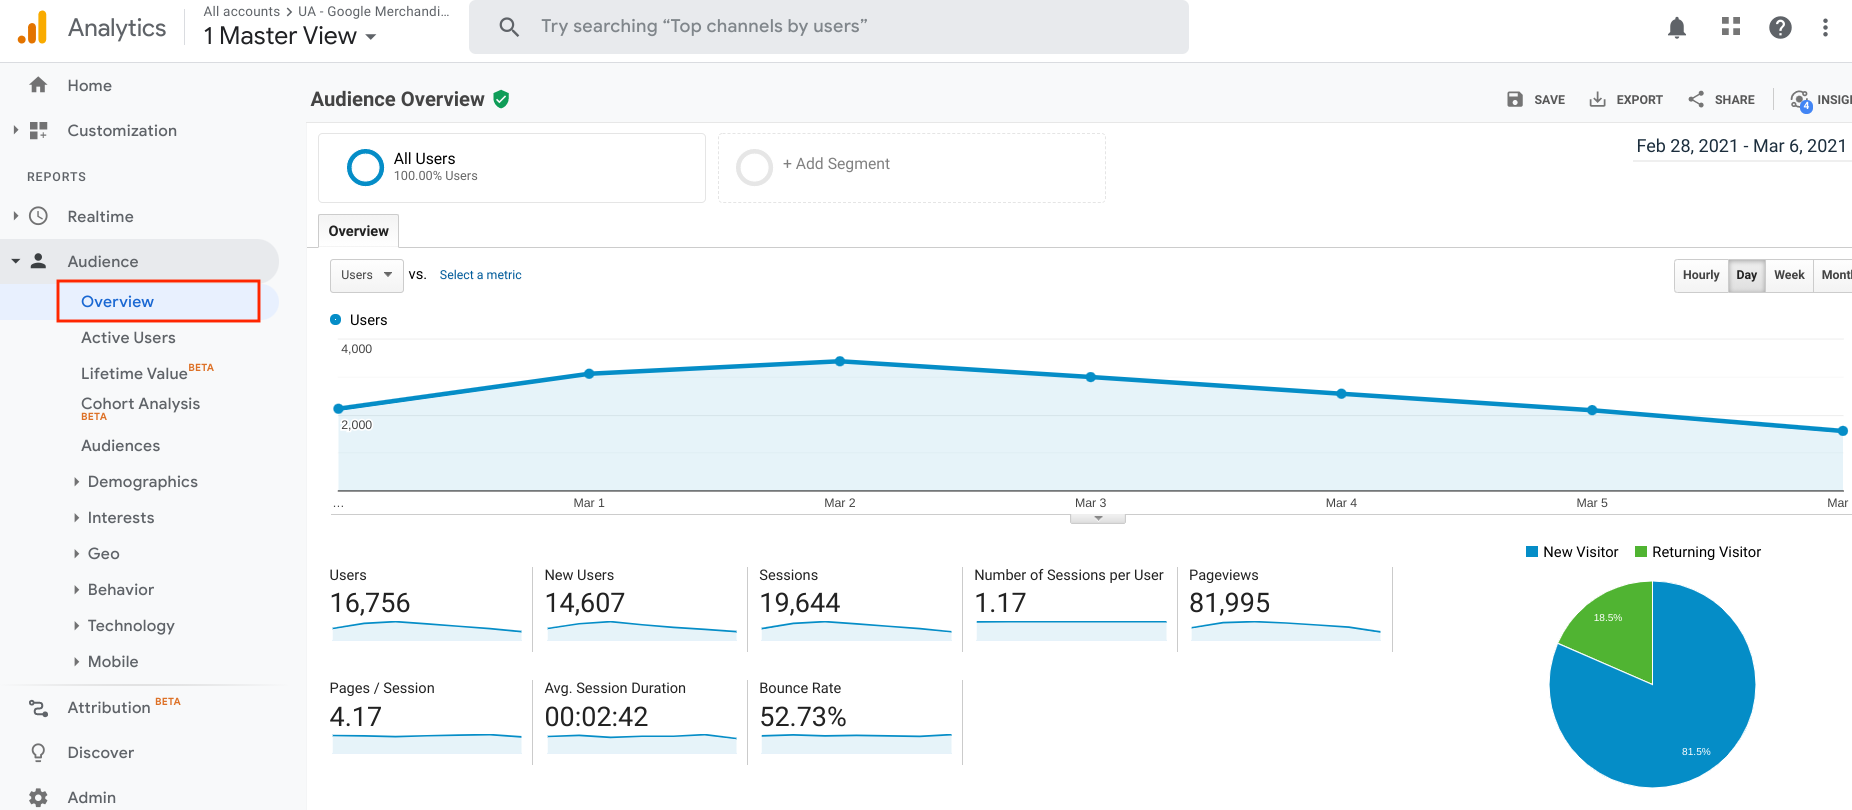
4. Click “Add Segment.”
5. Click the red “New Segment” button.

6. Enter your Segment name. Make sure it’s easy to identify, such as “Employee Traffic.”

7. Click on “Conditions,” under “Advanced.”
8. Select “Page Title” and “Exactly Matches” and click on your employee landing page in the drop-down menu.

9. Click “Save.”
Incorrect RegEx
Another reason your Filter may not be working is that you haven’t formatted it correctly. For example, when you’re filtering out an IP address, you must put a slash before the periods in the address when using regular expression.
For example, the IP address 89.654.01.105 should be formatted as 89.654.01.105 when setting up your IP Filter.
Also, always double-check that you’ve selected the correct option from the Google Analytics drop-down menus when setting up your Filters. There is a big difference between “that contain” and “that begin with.”

For more information about filtering out multiple IP addresses, check out our previous post on that topic.
You Haven’t Set up a Referral Exclusion for your Subdomain Filter
Another common reason for View Filters in Google Analytics is to filter out subdomain traffic. This allows you to see how your subdomain, such as your blog or shop page, is performing.
However, a common mistake when setting up these Filters is forgetting to add a subdomain Referral Exclusion. Without this exclusion, your subdomain traffic will present as self-referring traffic every time users move between your subdomain and root domain. This will inflate your root domain metrics.
To set up your Referral Exclusion, follow these steps:
- Go to “Admin.”
- Select your desired subdomain.
- Click “Tracking Info.” in the “Property” section.
- Click “Referral Exclusion List.”
- Click “Add a New Referral Exclusion.”
- Type in the name of your subdomain (with no backslashes).
- Example: my.measureu.com
- Click “Create.”

Always Set Up a Test View for Your Filter
For every new Filter you use, set up a Test View to verify that it’s working properly. Your Test View allows you to check that your Filter is working how you expect before you apply it to your property.
To set up your Test View, all you have to do is click on “Verify this Filter” after you’ve set up a new Filter in your account.
Other Ways to Test Your Filters
To make sure your meticulously crafted Filter is working, we always recommend testing it as soon as you set it up.
There are a few ways you can do this.
First, the Google Analytics Debug View is super helpful when testing your Filter. You can also use the Google Tag Assistant to make sure your Filter works properly. With the Google Tag Assistant, you can record your session. Once you’re finished recording, you can go to your Google Analytics tab and test what would happen if you were coming from a specific IP address or location.
You can enter an IP address your Filter should exclude and run your recording to see if the traffic is being filtered the way you expect. You can also use this hack to test a Filter that’s set up for a specific city, region, or country.

Finally, you can always go to your Realtime Reports and check the activity your View Filter should exclude. Your Realtime Reports can help you troubleshoot your Google Analytics property and the way you have things set up.
Here’s how to check your Realtime Reports:
- Go to your Google Analytics account.
- Select your property.
- Go to “Realtime” > “Overview” in the lefthand panel.

Filters Are Your Friends!
Google Analytics View Filters can sometimes be a bit frustrating, but the benefits they offer make them absolutely critical to serious data analysis.
Whether you’re looking to exclude internal traffic, set up a Filter for your subdomain, or anything else, Filters are one of the best ways to make your Google Analytics account work for you.
The best advice we can give you is to always test your Filters and look for the obvious reasons they may not be working before panicking (such as an incorrectly entered IP address). The answer is often simpler than you may think, so check the basics before getting too frazzled.
Have you encountered any different issues with your View Filters? Let us know in the comments!